
I’ve been fascinated by galantines for a long time. Maybe because this attractive and tasty dish seems almost magical. Of course, compared to the fancy arrangements of food depicted in books from the 19th century, the galantines seen today are relatively tame. But still, when placed alongside the platters of food that adorn our modern banquets, galantines can easily steal the show.
Besides the galantine, there’s another dish in French cuisine with a similar sounding name: ballotine. Judging from some of the recipes I’ve found, the two terms can refer to the same dish. Recipes with either name usually are for a forcemeat cooked inside another meat. Some books make a distinction between the two dishes, but some only describe one or the other. Prosper Montagné goes as far as stating that the term ballotine “should only apply to a piece of butcher’s meat, boned, stuffed, and rolled, but it is in fact also applied to various dishes which are actually galantines.” [Montagné, Prosper. Larousse Gastronomique. Translated by Patience Gray, Nina Froud, Maud Murdoch, Barbara Macre Taylor. Edited by Nina Froud, Charlotte Turgeon. New York: Crown Publishing, Inc., 1961. Originally published as Larousse Gastronomique (Paris: Librarie Larousse) in 1938. Page 439.]
 If all the definitions I found, both actual and implied, are averaged, the result would be something in the order of a galantine being a dish made from boned poultry or meat that is stuffed with a forcemeat, pressed into a cylindrical shape, and poached in an aspic-producing stock. The galantine is served cold, coated with the aspic. Many of the recipes for ballotines I found would also fit this definition. Others use all the meat from the animal being boned in the forcemeat so the outer wrapping is nothing more than the skin or just a sheet of barding fat. Also, some ballotines are served hot or braised rather than poached. The more recipes I read, the more jumbled the definitions became in my mind.
 The origin of the two terms is also not conclusive. The term galantine may have evolved from the Old French term for “jelly,” but early spellings of galantine include garentine and galatina, which do not appear to be derivatives of the word. Prosper Montagné proposed that the term evolved from the Old French word for chicken: geline or galine. I find this odd because the earliest galantine recipes were for eel served in a jelly made from the poaching bouillon mixed with eel blood and seasoned with ginger, cloves, grains of paradise, cinnamon, nutmeg, and long pepper. Early galantines were not stuffed chicken. Two hundred years later, when the term galantine appears in a cookery book in its final spelling, the recipe is for a suckling pig stuffed with forcemeat.
The term ballotine is more straightforward. It is derived from the French noun ballot, bundle, and the verb ballotter, to roll around. Montagné describes a ballotine as being “a piece of meat, fowl, game, or fish, which is boned, stuffed, and rolled into the shape of a bundle.” The term is much newer. It starts to appear in cookery books in the 19th century.
Although not out of the range of a home cook, galantines have traditionally been the product of professional kitchens. A galantine is not a last-minute dish. Depending on what items the chef has on hand and what has to be specially prepared, the finished dish can take up to a week to prepare.
The following recipe is an amalgamation of many of the recipes for galantines encountered in my research. It is presented below with comments specific to each part of the recipe. Clicking on any comment will hide all the comments. Pressing the C key will cause the comments to reappear. Clicking on a picture will enlarge it.
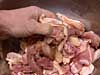
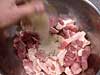
 Cut the veal, pork meat, and pork fat into 1-cm square strips and place in a non-reactive bowl. Combine the curing salt, pepper, and quatre épices and add the mixture to the meats. Mix well. Transfer meat to a plastic bag and refrigerate overnight.
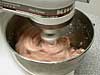
 Grind the seasoned meat and fat together through a 3-mm grinder plate. Add the wine and mix thoroughly until the fat starts to smear. Wrap tightly with plastic film and refrigerate overnight.
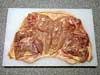 Spread the chicken out on a work surface, skin side down, so it forms a rectangular shape and the meat extends with a slight margin to the edge of the skin. Arrange the legs and wings, under the skin, so the meat is evenly thick over the surface of the chicken.
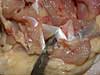
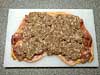 Spread about two-thirds of the forcemeat mixture over the chicken meat. Press the forcemeat over the chicken to even out the surface. Leave a 2 to 3-cm margin at the edges of the skin created by the original cut along the back.
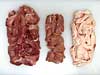
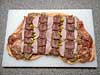 Cut the meat for the stuffing additions into 3-mm thick slices. Arrange all the stuffing additions over the forcemeat in a single layer, allowing a slight margin at the edges of the forcemeat. Press the additions firmly so they adhere to the forcemeat.
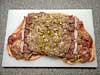 Carefully spread the remaining forcemeat over the stuffing additions. Press this last layer to smooth out its surface.
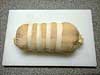
 Place the entire “package” on a piece of moistened, unbleached muslin that is large enough to completely enclose the stuffed chicken. Roll the cloth tightly around the meat to form a long sausage shape. Using strips of muslin, tie the bundle along its length to prevent it from unwrapping during poaching.
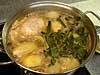 Place the chicken bundle in a large stock pot. Add all the poaching liquid ingredients plus the reserved chicken bones and the reserved pork skin, if applicable. Add sufficient water to the pot to cover the galantine. Bring to a boil, lower heat, and simmer until the galantine reaches a temperature of about 70 °C (155 °F), about 11/2 to 2 hours. Skim and discard any scum that floats to the surface.
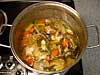 When the galantine is cooked, remove it from the pot and set aside for 15 minutes to cool slightly. Continue simmering the poaching liquid for another couple of hours to further enrich it.
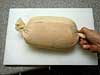
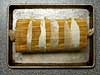 Cut the ties holding the cloth around the galantine. Unwrap the galantine. Rinse the cloth and rewrap the chicken tightly. Wrap some sushi mats, a thin flexible cutting board, or other stiffening device around the galantine and tie into place. Twist the ends of the cloth and tie with string. Set the bundle in a refrigerator until completely cooled, about 12 hours.
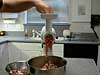
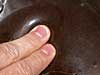 Test the clarified stock for stiffness. If it gives way easily when pressed with a finger, more gelatin is required. If it is very stiff and rubbery, the aspic is ready and no further gelatin is required.
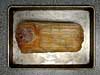 Remove all the wrapping from the galantine and discard. Set the galantine on a rack placed over a baking sheet. Keep chilled until needed.
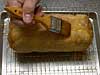 When the first layer of aspic is hardened, repeat with a second layer.
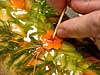 Apply the vegetables for decoration. For larger pieces, brush the pieces with aspic before applying, using the aspic like glue. For small pieces, apply fresh aspic to the galantine surface and then place each piece in position. Use a toothpick or skewer to adjust the position of a piece if necessary. The fresh aspic should stiffen in place on the galantine relatively fast because of the chill of the galantine, but it also may be necessary to further chill the surface in the refrigerator from time to time.
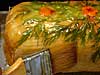 After the decoration is complete, apply two more layers of aspic over the entire surface of the galantine to seal the decorations.
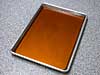 Add the reserved aspic to any remaining from the coating process and melt it in the warm water bath. When fluid, pour the aspic onto a baking sheet so it forms a depth of between 1/2 and 1 cm. Chill until solid in the refrigerator.
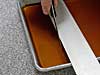 Prior to serving the galantine, dice the aspic chilled in the baking sheet. To do so, make a series of parallel cuts in the aspic, spaced between 1/2 and 1 cm apart. Turn the baking sheet 90° and make another set of parallel cuts, also spaced between 1/2 and 1 cm apart. Slide a spatula under the aspic to release it from the pan. Break any clumps into individual cubes.
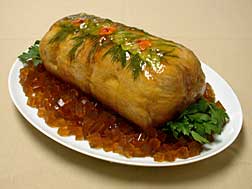
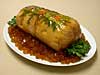 Place the galantine on a platter. Strew the aspic around the base of the galantine. Decorate the platter with parsley.
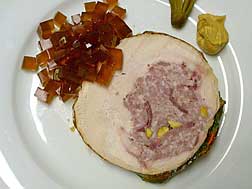
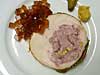 To serve, slice the galantine into 1-cm thick slices. Place a slice on each serving plate along with some aspic. Garnish with a cornichon and a small spoonful of Dijon-style mustard.
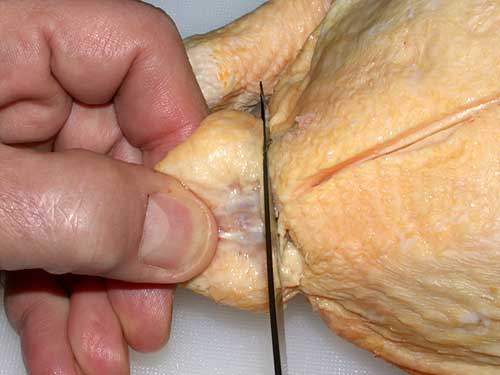
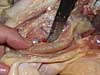
 Rinse and dry the chicken. Place the chicken breast down on a cutting board. Using a small sharp knife, cut along the midline of the back, through the skin and meat to the bone, from the neck to the tail. Remove and discard the tail.
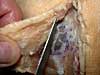 Working on one side of the chicken at a time, starting from the tail, scrape the meat from the carcass. Use the edge of the knife to “push” the meat away from the bone as much as possible.
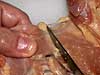
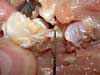 When the joint where the thigh bone (femur) attaches to the body is reached, gently push the thigh up and towards the breast bone. This should expose one of the two ligaments that attach the thigh to the body. Cut the ligament.
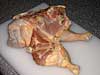
 After the first ligament is cut, the second one should be visible when the thigh is pulled slightly away from its socket in the body. Cut the second ligament. This should free the thigh from the body, leaving it attached only by skin and a little muscle. Trim this muscle from the carcass.
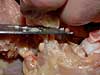
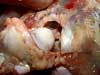
 Cut between the shoulder blade (scapula) and the ribs until the lower edge of the large breast muscle (pectoralis major) is reached. Cut the ligaments and tendons at the wing end of the shoulder blade to free it up from the wing. Do the same with the wing bone (humerus) where it attaches to the body. Finally, cut the cartilage that attaches the wishbone (clavicle) to the body. The wishbone will still be connected to the breast bone (sternum). This can be separated now or later.
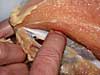
 The larger of the two breast muscles (pectoralis major) is attached at the ribs by a fine membrane. Carefully cut this membrane and the first centimeter of muscle away from the ribs along its entire length. Carefully slide a finger underneath the muscle, pressing all the time against the ribs. Use a finger, sliding back and forth from neck to tail, to separate both breast muscles from the carcass.
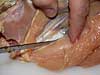 Continue working until the keel bone is fully exposed. At this point, one side of the chicken carcass should no longer have any meat attached to it except along the edge of the breast bone.
 Locate the two shoulder blades in the meat. Slide a knife under each bone and separate it from the meat. Set both bones aside with the reserved bones.
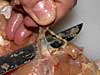 Locate the wishbone in the meat. Cut along the edge of the bone to release it from the meat. Break the wishbone into two or three pieces and set aside with the reserved bones.
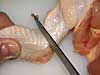 Separate each wing at the first joint. Chop the wing tips and lower wing bone into a couple of pieces and set aside with the reserved bones.
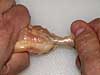
 Cut the meat away from the head of one of the wing bones where it was attached to the carcass. Use the back edge of the knife to scrape the meat off the length of the bone. Holding the bone in one hand and the wing meat in the other, pull the bone from the meat causing the meat to turn inside out. Cut the meat from the end of the bone so that only a minimal amount of skin remains attached to the bone. Repeat with the other wing.
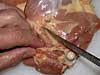 Place one of the legs against the cutting board so the inner surface of the thigh (femur) and leg (tibia) is up. Cut along the center of the bones, through the skin and meat, to the surface of the bones. Using the back edge of the knife, or a couple of fingers, separate the meat from the length of the thigh bone. Pull the meat along with any cartilage from the head of the bone. Cut the cartilage from the meat and add to the reserved bones.
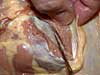 Separate the joint where the thigh and leg attach to each other. Completely remove the thigh bone, chop into a couple of pieces, and save with the reserved bones.
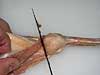 Free up any meat that is still attached to the leg at the thigh joint. Once the meat is free from the joint, hold the bone in one hand and the leg/thigh meat in the other. Pull the bone from the meat causing the meat to turn inside out. Cut the meat from the end of the leg bone so that only a minimal amount of skin remains attached to the bone. Chop the leg bone into a couple of pieces and save with the reserved bones.
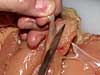 As the final step, using a small knife, carefully remove the tendons from the center of the two smaller breast muscles (pectoralis minor) by scraping along the tendons with the tip of the blade.
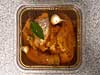 Prepare the pickling brine: Place the water, salts, and sugar in a non-reactive container large enough to hold the tongues, and dissolve the solids with the aid of a stick blender. Inject the centers of the tongues with some of the plain brine. Add the remaining brine ingredients. Place the tongues in the brine and weight in place. Cover and refrigerate.
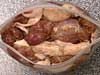
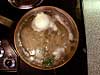 Remove the tongues from the brine, reserving the garlic cloves and bay leaf. Rinse the tongues thoroughly with cold water. Place the tongues in a saucepan along with the reserved ingredients and the poaching liquid. Bring to a boil, reduce to simmer, cover with a drop-lid, cover the saucepan, and cook until the meat is tender when pierced with a long fork, about 90 to 120 minutes.
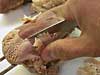 Remove the tongues from the saucepan. Allow them to cool briefly. Peel the loose outer skin from the surface of the tongues.
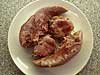 Serve warm or cold, or use for another recipe.