One thing that I’ve learned from working with chefs throughout the years is that tasks that look on the surface to be difficult often are not. When teaching a trick to students, I repeatedly witness the same “ah hah” reaction that I’m sure I exhibited when I first saw a chef do this same thing. It’s the reaction you have to something that seems difficult but turns out to be easy. It’s the reaction you have when you discover how something is done. Over time I started to think a lot of these “tricks of the trade” as being reminiscent of a fraternal organization’s secret handshake, the greeting that only members know. But there never has been anything secret about them, and I never had to join up to learn them.
In retrospect, for the last 40 or so years I’ve been learning these tricks the entire time I’ve been learning how to cook. Whether learning directly from other people or from reading, I’ve learned both the right and the wrong way to do many things in the kitchen. Unfortunately, like most people, I learned the wrong way first and then it was many years before I learned the error of my ways, often not until I was exposed to a professional environment. I came to realize that many home cooks do things the wrong, or at least the more difficult, way. And the fact that these same people may write a book, doesn’t make their information any better!
Along the way I’ve also learned that many professional chefs don’t do everything correctly or most efficiently. They often do things the way they were taught in cooking school, or at least how they remember it, or they do things the way they learned from other chefs. In either case, what they learned may not have been the best way to do things. One year I shucked scallops in three different Michelin-starred restaurants in France. Each chef had his own way to shuck a scallop and each claimed that his method was the best. In each restaurant, I shucked as I was instructed. On my own, I use the method that seems to make the most sense in terms of efficiency and product quality.
Each day as I do my mise en place for the evening meal, whether a simple repas for one or two or a festive preparation for a group of gourmands, I am amazed at how many tricks or techniques I may use that I’ve learned since I started working with cooking professionals. (I’m also amazed at how many times when I’m assisting a chef at a local cooking school that I want to interrupt the chef during class to say, “I have a better way of doing that!” But I don’t.)
The following is not an exhaustive list of secret handshakes. I’ve just made a few notes as I cooked recently of the various techniques that I was using. Some will probably be “old hat” to you but others may be helpful.
Restaurants have a marvelous machine for rolling dough into thin, even sheets. It resembles a wringer that looks similar to one that used to be found next to a washing machine 50 years ago.
MORE
Restaurants have a marvelous machine for rolling dough into thin, even sheets. It resembles a wringer that looks similar to one that used to be found next to a washing machine 50 years ago. There is a wide cloth conveyer belt on each side of it. The dough is placed on one of the belts and electromechanically fed through the rollers. The conveyor on the other side catches the dough as it comes through the rollers. When the dough is all the way through, the spacing on the rollers is reduced and the conveyors reversed. As the dough sits on a conveyor, it can be dusted with flour or excess flour can be brushed off.
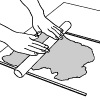
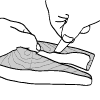
In kitchens without one of these machines, there’s a simple method that can be used to achieve consistent results. A pair of “rails” can easily be constructed for the rolling pin to rest on as it is moved to and fro. The rails limit the thickness (thinness?) to which the dough can be rolled. At Restaurant Patrick Jeffroy in Carantec, France, they use 3-cm wide strips of tag board cut from an old calendar. Each strip is about a millimeter thick and they stack the strips to achieve different heights. I use a couple of 3-mm thick copper bars that I found in a friend’s metal working shop. The copper is heavy enough so the rails don’t move when the rolling pin is moved.
To use the rails, place one on each side of the dough being rolled out. They need to be close enough so the rolling pin can roll on both at the same time, but far apart to allow the dough space to spread as it is rolled. They work best with a long rolling pin.
LESS
Most of the time, a spoon is used to hold something, such as when we eat soup, or to stir something, such as when we add sugar to our tea. Sometimes the back of a spoon can be its most useful part.
MORE
Most of the time, a spoon is used to hold something, such as when we eat soup, or to stir something, such as when we add sugar to our tea. Sometimes the back of a spoon can be its most useful part. When a recipe calls for a sticky item to be spread in a circle, the back of a spoon is ideal for this. As an example, when making
tuiles, or similar cookies, drop scant teaspoon portions (use a dessert spoon, not a measuring spoon) on a baking sheet covered with a silicon liner. Use the back of the spoon to spread the batter into even circles.
In a similar manner, the bottom of a ladle can be used to spread sauce in a circle. Use a small ladle to place a portion of sauce in the center of a plate. Then moving the bottom of the same ladle in a circular pattern, push the sauce outward from the center until the desired size puddle is reached. The ladle, since it has a round shape, seems to be easier to use for producing a circle than a large spoon. If the shape doesn’t need to be an even circle, the back of a large serving spoon will also work.
LESS
Ladles are a great tool often absent or underrepresented in the home kitchen. Everyone has a soup ladle, but not everyone has portion ladles. The best ones are made out of stainless steel and are cheap.
MORE
Ladles are a great tool often absent or underrepresented in the home kitchen. Everyone has a soup ladle, but not everyone has portion ladles. The best ones are made out of stainless steel and are cheap. They have a handle that is almost vertical when the bowl of the ladle is full. The handle ends in a hook-shaped bend that catches on the edge of the bowl to prevent the ladle from sinking in the liquid when the ladle is resting in it. The hook shape is also a convenient place for the operator to hold the ladle with the forefinger comfortably under the bend. Ladles come in a variety of sizes. The best ones for kitchen use are calibrated and marked for use in portion control, usually in milliliters and fluid ounces and in increments of one or two tablespoons. They come with short and long handles in the smaller sizes and both are useful. Although fancy, expensive ladles are available for table service, those designed for kitchen use are usually inexpensive.
Ladles are helpful when dividing a liquid into multiple equal portions. I’ve learned from experience that one, full 30-ml (2 tablespoons) ladle of batter is perfect for making a crepe in a small frying pan. For a large crepe, I use a 60-ml (
1/
4 cup) ladle. In a similar way, a ladle is an ideal tool for placing a controlled amount of sauce on a plate.
A ladle is a handy tool for adding liquid to ramekins and other containers with small openings. By selecting a ladle that is smaller in diameter than the opening, it is easy to add liquid to the container without spilling.
A ladle with a short handle is an ideal tool for removing the scum or fat that has collected on the surface of a stock while it is simmering. The ladle can be placed in the stock just to the point where its rim is even with the level of the liquid. As the ladle is carefully moved along the surface so the rim stays even with the surface of the liquid, the scum or fat floating on top of the liquid flows into the ladle.
LESS
When you go to a fine dining establishment, it’s rare that you are in a position to watch as your meal is plated. If you could, you may be surprised to see how it’s done.
MORE
When you go to a fine dining establishment, it’s rare that you are in a position to watch as your meal is plated. If you could, you may be surprised to see how it’s done. When a plate holds multiple items, it may have required multiple people in the kitchen to plate it. One tool you may not expect to see along with the spoons, spatulas, forks, tongs, and fingers used to plate your meal is a mousse ring—sometimes referred to as a flan ring or cake ring.
Mousse rings are cylinders of aluminum or stainless steel used for baking individual cakes. They are available in a variety of diameters and heights. When used for plating, the mousse ring becomes a form for building cylindrical-shaped arrangements of food. Depending upon how sticky the food is, after it is formed in the mousse ring and the ring is removed, the result may be an even cylinder or a truncated cone. Tartares are sticky enough to be formed into cylinders, whereas a salade de lentilles will form into a truncated cone.
To use a mousse ring for shaping the plated food item, place the ring in position on the serving plate. While steadying the ring with one hand, carefully spoon the food into the ring with a spoon that’s smaller than the diameter of the ring. Use the back of the spoon to compress the food in the ring and to smooth out the top of the presentation. Once the ring is filled, carefully lift it straight up off the plate.
Round cutters designed for cutting disks from pastry dough can be substituted for mousse rings.
LESS
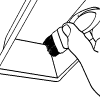
Meat is malleable. With enough force it can be shaped. Actually, a fat piece can be made thin. By pounding, a thick slice is formed into a wide thin slice.
MORE
Meat is malleable. With enough force it can be shaped. Actually, a fat piece can be made thin. By pounding, a thick slice is formed into a wide thin slice. By pounding, a chicken breast becomes a chicken cutlet.
There are a number of configurations of meat pounders available. Some are simply wooden mallets. Others are a handle with a heavy metal disk fastened to the end. Some are just a large, thick square of metal with a handle welded to one edge. Whatever type is used, there’s one problem the novice will encounter: how to keep the meat from sticking to the cutting board and pounder when it’s being pounded?
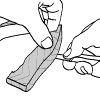
I don’t know how this problem was solved in the early days of cooking. Today, the easiest way is to first place a piece of plastic wrap on the cutting board. Next place the meat in the center of the plastic. Lastly, cover the meat loosely with another sheet of plastic. Now pound. Although most of your pounding motion will be directly into the work surface, move the pounder a bit towards the side at the same time to encourage the meat to “grow” in that direction as you pound. The meat will thin and flatten between the two sheets of plastic without sticking to the meat pounder. When the meat is as thin as desired, the plastic is peeled off the meat. It can be reused for a number of pieces of meat.
Because pounding tends to make the meat a bit sticky, it can be used as a method for combining two pieces of meat together. When pounding a chicken breast, the tenderloin, which tends to come loose while the breast is boned, can be placed back in position. When the meat is pounded, the two pieces will stick together.
LESS
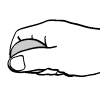
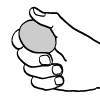
Some things are hard or tedious to peel when they are raw. Almonds, pearl onions, broad beans, and English peas come to mind. But with a short, hot bath, the chore becomes simple, although it can still be tedious.
MORE
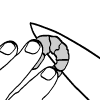
Some things are hard or tedious to peel when they are raw. Almonds, pearl onions, broad beans, and English peas come to mind. But with a short, hot bath, the chore becomes simple, although it can still be tedious. All of these items benefit from a short blanching before peeling.
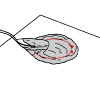
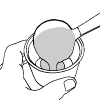
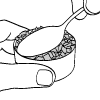
Almonds are the easiest to peel. Blanch raw, shelled almonds in boiling water for about a minute. Drain. Set the colander holding the hot almonds in the center in front of you on the work surface. On each side, place an empty bowl. Pick up an almond between your thumb and forefinger and pinch it. Catch the almond as it pops out of the skin in your other hand. Discard the empty skin in one bowl and the peeled almond in the other. If there’s a little skin still stuck to the almond, it’s easy to scrape off with your finger nail. I peel the almonds hot as soon as they are drained. Some people prefer to wait until they cool a bit. If you wait too long, the process becomes harder because the skin can re-adhere to the nut meat when it cools.
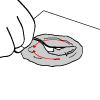
Pearl onions and other small boiling onions usually have a very thin outer skin. Before blanching the onions, cut any loose roots from the onion without cutting into the skin. Blanch the onions in boiling water for about 30 seconds. Drain. The outer skin should be easy to remove by pinching the onion between your thumb and forefinger.
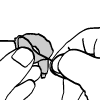
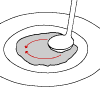
Broad beans and English peas are skinned using the same technique. The shucked beans or peas are blanched in boiling water for about 30 seconds. Bowls are set on either side of the colander as described in the almond peeling directions. Unlike the previous two items, beans and peas cannot be skinned simply by pinching them after blanching. Doing so would crush the bean or pea inside the skin. Before pinching, it is necessary to make a small nick in the skin with the tip of a small knife. A small paring knife can be used, but a bird’s beak knife seems to work best. The knife is held with a choke grip in the hand that isn’t pinching the bean or pea. Pick up a blanched bean or pea between your thumb and forefinger. Make a small nick with the tip of the knife in the end of the bean or pea. Pinch the bean or pea to push it out of the skin into your knife hand. Discard the empty skin in one bowl and the peeled bean or pea in the other.
LESS
The price of vanilla beans seems to always be increasing. So it’s important not to waste any of the bean.
MORE
The price of vanilla beans seems to always be increasing. So it’s important not to waste any of the bean.
If a recipe calls for adding the seeds to a liquid and then heating the liquid, such as with crème anglais, don’t bother to scrape the seeds from the vanilla bean. Just split the bean in half and add it to the liquid as it is being heated. The seeds will be released from the bean by the hot liquid. Don’t forget to fish the empty bean from the liquid after the seeds have been released.
When stripping the seeds from a bean with a knife tip, don’t discard the empty bean. It can be used to make a preparation called vanilla sugar. Simply add an empty bean or two in about a quarter kilo of finely granulated sugar and set both aside in a sealed container. After a few days, the sugar will take on a vanilla flavor. Leave the empty beans in the sugar until the sugar is used up.
Sometimes a recipe will call for a packet of vanilla sugar, since that’s how most people purchase vanilla sugar. The standard package size for a packet of vanilla sugar in France is 9 grams. So when a recipe calls for a packet of vanilla sugar, just add 9 grams, about a level tablespoonful, from your homemade stash.
LESS
Large salmon and similar fish are often sold by the piece, be it a fillet or a steak. If your fishmonger provides full service, the bones and scales will be removed from a fillet.
MORE
Large salmon and similar fish are often sold by the piece, be it a fillet or a steak. If your fishmonger provides full service, the bones and scales will be removed from a fillet. Hopefully the scales will be removed from the steak, too, but the bones will surely still be in place since the steak portion tends not to stay intact if the bones have been removed. But it’s much nicer to serve a portion with the bones removed. Also, when cooked simply as a steak, the thin tips from the belly portion tend to get overcooked.
You should now have a piece of fish that is boneless, except for the pin bones. Rub the meat with your fingers to find the remaining pin bones. Remove them with a small pair of pliers or fish tweezers. If the piece of fish had part of the dorsal fin attached, cut this off close to the back with a pair of heavy-duty scissors. All the bones should be easy to remove. Be sure not to leave any behind since the guest expects a boneless serving.
Place the fish steak sideways on the cutting board, near the edge, so it is resting on its skin. Slide a knife between the skin and flesh directly below where the spine once was. The blade should be against the skin and the cutting edge pointed towards the belly. Move the knife towards the belly so the skin is released from the flesh. Only do this on one side of the steak.
Lay the steak flat on the cutting board. Roll the belly flesh from the side just separated from the skin inward. Tuck the belly flesh from the other side around the first and under the loose flap of skin. Pull the skin around the second side so the steak forms a round disk.
Push two skewers through the center of the disk to hold the parts in place during cooking. Start the first skewer at the end of the loose piece of skin. Pull the skin tight as you push the skewer through the fish. Start the second skewer about 90 degrees away from where the tip of the other side of the belly is tucked under the skin.
Cook the boneless steak the same way as a regular fish steak is cooked. Remove the skewers before serving.
LESS
Modern French cooking includes all sorts of raviolis, but they usually are made individually rather than in large sheets.
MORE
Modern French cooking includes all sorts of raviolis, but they usually are made individually rather than in large sheets. If prepared from two sheets of fresh pasta dough and a filling, there’s a simple way of producing a finished ravioli that has a shape more like a top hat and less like a bowler hat.
Lay the first sheet of fresh pasta on a work surface. Spoon some of the filling into place and form into a mound. Use your finger to lightly wet the area around the mound. Place the second sheet of fresh pasta over the mound and gently press the two pieces of pasta together.
You should now have a bowler-hat shape. To turn this into a top hat, you’ll need a small, round cutter. A cutter that comes in a set of different sizes will work well. One end of the cutter has a rolled edge. You’ll use this round edge to shape the ravioli. Place the cutter, rolled edge down over the mound in the center of the pasta dough. While sliding the cutter in a circular fashion around the mound, gently use the round edge to push the mound into a cylindrical shape. At the same time, gently press on the top of the mound with the forefinger of your other hand. The pasta dough should be malleable enough to allow the filling to reshape into a top hat.
The last thing left is to trim the excess pasta dough. This can be done with a knife or with a larger cutter. Set the finished raviolis aside on a piece of parchment paper until you plan to cook them. Don’t overlap the raviolis or they may stick together. It’s also wise to dust the paper and raviolis with flour.
LESS
It’s not uncommon to have a recipe that calls for some lemon zest, but not for any more of the lemon. If the denuded lemon is simply placed in the refrigerator, it will quickly dry out.
MORE
It’s not uncommon to have a recipe that calls for some lemon zest, but not for any more of the lemon. If the denuded lemon is simply placed in the refrigerator, it will quickly dry out. Even if only a small section of the outer zest was removed, the lemon will dehydrate.
There is a simple solution: give the lemon a new skin. Using a good quality plastic wrap—preferably made from polyvinyl since it sticks to itself better—lay a piece on the work surface that’s large enough to enclose the lemon in a double or triple layer when rolled around it. Place the lemon at one corner of the plastic wrap and roll it around the lemon so it is encased in a “tube” of plastic. Twist the loose ends of plastic wrap to tightly enclose the lemon. Try not to capture any air in the package. Then tie the two loose ends of plastic wrap in a simple knot to fully enclose the lemon. It will now last for quite a long time in the refrigerator.
A similar method can be used to save half a lemon. Place the cut end down in the center of a square of plastic wrap. Gather the ends of plastic wrap around the lemon and twist them tightly without trapping any air in the package. Continue turning the twisted end until it starts to double up on itself. Wrap the tail between the doubled-up end and the body of the lemon. By pulling the end tightly into the space, the tail will stay put.
These same preservation techniques can be used with other citrus fruits such as limes, oranges, and grapefruit.
LESS
When cooking dense vegetables, there’s an easy way to judge when they are “done”—poke ’em. Yep, just poke the vegetable while it’s cooking with the tip of a small sharp knife and you can tell how much it is cooked.
MORE
When cooking dense vegetables, there’s an easy way to judge when they are “done”—poke ’em. Yep, just poke the vegetable while it’s cooking with the tip of a small sharp knife and you can tell how much it is cooked. The process is quite simple, but there is a short learning curve.
To use the knife as a test instrument, hold the handle between your thumb and forefinger with the tip of the blade pointed down. Insert the tip a short way into the test vegetable. If the vegetable is cooked properly, the tip should slide in easily without mashing the vegetable. When the tip is removed, the vegetable should slide easily off the knife under its own weight.
When starting out to use this method of testing for doneness, it is helpful to first try it on the vegetable while it is still raw to feel how the knife moves through it, and then to try again periodically to see how the vegetable’s texture changes as it is cooked. Remember the changes for the next time you use this method. With a little practice, you’ll become skilled at testing vegetables. You’ll also be able to judge when a vegetable is partially cooked if you are using a combination of methods for the cooking.
LESS
It’s not uncommon to boil a vegetable and then to stop the cooking process with an ice-water bath. The chilled vegetable is then drained well before preparing it for the final dish.
MORE
It’s not uncommon to boil a vegetable and then to stop the cooking process with an ice-water bath. The chilled vegetable is then drained well before preparing it for the final dish. For many vegetables a colander is sufficient for the draining, but long vegetables, such as asparagus, can become damaged in the colander. Also, if the vegetable is to be refrigerated for some time before use, a colander may not be a practical way of storing it.
In commercial kitchens, a perforated hotel pan—a rectangular stainless steel pan used to cook, store, and serve food that is designed to fit in steam tables, racks, and chafers—is used like a colander for draining and storing. In the home kitchen, this is impractical.
In the home kitchen, line a rimmed baking sheet or jellyroll pan with a few layers of kitchen towels. Arrange a double layer of absorbent paper flat over the cloth towels. Spread out the drained vegetable on the paper. Set aside until needed. If you plan to store the vegetable for a while, such as overnight, tightly cover the pan with plastic wrap and refrigerate.
LESS
You probably leave the process of butchering your meat to your butcher, but once in a while there’s an occasion where a little touch-up is needed. Are there some simple tricks that simplify the process?
MORE
You probably leave the process of butchering your meat to your butcher, but once in a while there’s an occasion where a little touch-up is needed. Are there some simple tricks that simplify the process? Yes.
Basic butchering consists of only three operations: boning, dividing, and cutting. Cutting a piece of muscle is a process that people are most familiar with and there’s not much to teach here except use a long knife and cut with a long sawing motion—don’t try to just push the knife through muscle.
Boning is a bit more difficult. Muscle is usually attached to bone in a fairly tenacious manner. To remove muscle from bone, it is usually scraped off with the tip of the knife. The cutting edge is pointed slightly towards the bone so the minimum amount of meat is left attached to the bone.
The real secret to butchering is dividing meat. But what does that mean? The next time you have a piece of raw meat in your hand—assuming the piece is not too small and is not from a small animal—notice that the piece is actually made up of multiple sections of different muscles. Usually, you will be looking at a cross-section of a group of muscles. If you pull the meat slightly, you’ll see the individual muscles attached to each other by some rather flimsy membranes. Each muscle is actually wrapped in a membrane and the membranes are lightly bonded to each other. When a muscle is placed under tension, i.e., pulled, the membrane is exposed. By cutting into the membrane with the tip of a small knife, the membrane will break away and the muscles will separate. The process requires almost no force on the knife and the edges of the muscles are left intact.
This process can also be seen in a chicken. When the leg and thigh portions are removed from the carcass, the loose skin on the front side near the junction is first cut from around the leg. When the thigh is rotated slightly away from the body, it is easy to see that only a flimsy membrane holds the interior side of the thigh to the carcass. This membrane is easily divided as described in the preceding paragraph. If you look into the joint where the thigh is attached to the carcass, it’s possible to see the ligaments that hold the two bones together. When these are cut with the tip of the knife, the thigh bone falls away from the carcass without any muscles being cut. The whole process can be seen
here.
This process of dividing meat may be useful for you if you buy meat for stewing in large pieces and cut them down to size yourself. You can buy chunks of beef, and sometimes pork or lamb, labeled as “stew meat” in most stores, but it is cut somewhat haphazardly and often the pieces are too small. If you buy a shoulder portion, either on the bone or boneless, and dissect out the individual muscles yourself, you’ll be able to clean out much of the gristle and other tough parts. The remaining large pieces can then be cut to size in an orderly manner.
Be in control of how your meat is cut—don’t let your butcher ruin it.
LESS
Blanching, parboiling, and boiling all involve placing an ingredient in rapidly boiling water. The difference is how long the ingredient is left in the water and how cooked the ingredient becomes.
MORE
Blanching, parboiling, and boiling all involve placing an ingredient in rapidly boiling water. The difference is how long the ingredient is left in the water and how cooked the ingredient becomes. In French-language recipes, the distinction is usually just how cooked the ingredient becomes. The same verb, bouillir, is used for all three actions.
Blanching is a quick process. Blanching is used to loosen the skin on various fruits, nuts, and vegetables, such as tomatoes, almonds, peas, or peaches. The raw ingredient is plunged into boiling water for a few seconds, or up to a minute, until the skin loosens. The ingredient is then quickly drained and then plunged into an ice-water bath to quickly cool the surface and to discontinue the cooking.
Parboiling is sometimes referred to as blanching in recipes because it also can be very quick, but the goal in parboiling is to partially cook the ingredient, which will be cooked further by another method. With green vegetables, parboiling helps to intensify the color, especially if the cooking water is slightly alkaline and the cooking time is keep short. Unless the parboiled vegetable is going directly to its final cooking process, it should be quickly drained and then plunged into an ice-water bath to stop any further cooking.
Boiling is simply parboiling carried to the point where a vegetable is fully cooked. When done, the vegetable can be quickly drained before serving. The vegetable will continue to cook for a while after it is removed from the boiling water because of the residual heat within the vegetable. It should be served immediately.
For both parboiling and boiling, the vegetables should be cooking in heavily salted water. The water should taste noticeably salty. The salt will help season the vegetable. In France, chefs taste the hot water after adding salt. Where a chef has specified the amount of salt in a recipe, it is usually about 20 grams, about a tablespoon, of coarse salt per liter of water.
The exception to the salt-water rule is dried beans, which should be cooked in plain water and salted at the end of cooking.
LESS
When a French recipe calls for a beet, it assumes that the beet is already cooked. For some reason, in most markets in France, beets are sold already cooked.
MORE
When a French recipe calls for a beet, it assumes that the beet is already cooked. For some reason, in most markets in France, beets are sold already cooked. I’ve asked a couple of chefs why this is so, and I’ve yet to get an answer. Anyway, unless a recipe calls for betteraves crue, raw beets, you’ll have to cook the beets and let them cool before the recipe can be prepared.

I’ve tried to boil, bake, and steam beets. Each method takes about the same amount of time. My preferred method is to bake beets. Each beet is placed on a separate square of aluminum foil. A few drops of oil are drizzled over the top of each beet. Then a few grains of coarse salt are sprinkled on top. The ends of the foil are gathered and the package is closed at the top by twisting the foil tightly. The beets are placed on a foil covered baking sheet—the packages will spit some juice out after the first testing—and placed in an oven preheated to 180 to 200 °C (355 to 390 °F). The baking time will vary depending upon the size and age of the beets. Small, young beets will take as little as 30 minutes, whereas larger, older beets can take up to 2 hours. Test the beets by piercing each near the top with the point of a small, sharp knife. The blade should go in rather easily. As the beets continue to cook, juice will exude from the holes created in the foil from testing. As each beet is fully cooked, remove it from the oven and set it aside to cool. Once the beets are cool, remove the foil and peel.
LESS
French chefs usually have one item in their cooking “first aid kit”—
beurre manié. It will be right there in a cooler near the range—a container of a yellowish, rock-hard paste.
MORE
French chefs usually have one item in their cooking “first aid kit”—beurre manié. It will be right there in a cooler near the range—a container of a yellowish, rock-hard paste. Beurre manié is used to thicken sauces, usually at the last minute.
To make beurre manié, mix equal parts, by volume, of soft butter and all-purpose flour. When the flour and butter are thoroughly and evenly mixed, pack the mixture into a storage container and refrigerate until needed.
To use the
beurre manié, whisk some into boiling liquid to thicken it. Be sure to break the
beurre manié into small pieces or it will take forever to dissolve. Alternatively, soften some of the
beurre manié in a little of the hot liquid before adding it to the larger quantity. The thickened sauce will need to be simmered, not boiled, a while to reduce the taste of the flour in the finished product.
LESS
If you plan to carve a chicken after roasting, confiscate the clavicle before you cook. In restaurants in France, the breast of a roast chicken is often carved into long, thin slices called
aiguillettes.
MORE
If you plan to carve a chicken after roasting, confiscate the clavicle before you cook. In restaurants in France, the breast of a roast chicken is often carved into long, thin slices called aiguillettes. These slices are made with the chicken laid keel bone up on a cutting board and with the knife blade held parallel to the board. The knife cuts all the way to the bones of the breast and then lifts slightly to release the slice. But this only works if one bone is missing, the clavicle.
The clavicle, or what is commonly called the wishbone, prevents the knife from cutting all the way to the ribs when the knife gets near the neck end of the breast because it extends past the plane of the breast. The solution is to remove the clavicle when the chicken is being prepared for roasting.
French recipes often call for a
bouquet garni as if it were a single ingredient you buy at a market. A
bouquet garni is a general term for a mixture of herbs gathered together and added to a dish during cooking.
MORE
French recipes often call for a bouquet garni as if it were a single ingredient you buy at a market. A bouquet garni is a general term for a mixture of herbs gathered together and added to a dish during cooking. In France, at least in the restaurants that I have worked in, dried herbs were never used as part of a bouquet garni.
Typical herbs used in a bouquet garni are thyme, flat-leaf parsley, bay, and the green part of a leek. Other herbs may be used in addition. If the dish will be strained when it is done, such as with a stock, the herbs are just tossed in loose. If it will be necessary to extract the bouquet garni separately after cooking, the herbs are tied into a bundle with a string. A number of cookbooks suggest leaving the string long and tying the loose end to one of the handles on the pot, but I’ve never seen this done in a restaurant and I’ve never seen a cook have problems finding the bouquet garni when the dish was complete.
The easiest way to build a
bouquet garni is to take a green leaf from a leek and fold it open flat. Lay the other herbs on top of the leek and fold the whole bundle over once or twice. Using a long length of string, hold a few centimeters in the little finger of the hand holding the
bouquet garni and use the other hand to wrap the
bouquet garni with most of the remaining string. Start wrapping at the end opposite of where it is being held and wrap towards the short end of the string. When the
bouquet garni is securely wrapped, tie the two loose ends of string into a tight knot. Trim the remaining loose ends of string and any pieces of herbs hanging out with scissors.
If you don’t have a leek leaf to use as a wrapper for the
bouquet garni, just bunch the herbs into a cylindrical-shaped bundle and tie it as if there were a leek leaf. It’s a bit harder to hold all the herbs together when you start, but with a little practice it gets easier. Plus, a messy
bouquet garni works as good as a neat one.
LESS
A cornet is a small piping bag made from parchment paper and it’s disposable. It can be made large or small and there are many ways to fold one.
MORE
A cornet is a small piping bag made from parchment paper and it’s disposable. It can be made large or small and there are many ways to fold one. I usually start with a quarter-sheet pan-size rectangle of parchment paper. I fold the paper on the diagonal and cut it at the fold with a small knife. This produces two right triangles of about 20 by 30 centimeters in size.
To fill the cornet, push the opening back into a round shape and, using a spoon or spatula, fill the cornet about two-thirds full. Fold the opening over once or twice to seal in the contents. Use scissors or a small knife to cut across the tip and create an opening. Start by making a small opening—it can always be enlarged.
To use the cornet, hold it in your writing hand. Hold the cornet by the fold at the top, not in the center. As you squeeze the contents out the tip, fold the top down. Never squeeze the cornet from the center. If you need support as you use the cornet, use your free hand to support the hand holding the cornet—don’t try to hold the cornet with two hands.
LESS
Cooking steaks, chops, and such in a restaurant is as easy as one-two-three—so are thick fillets of fish and boneless chicken breasts. The method is the same for all: one—sear; two—bake; and three—rest.
MORE
Cooking steaks, chops, and such in a restaurant is as easy as one-two-three—so are thick fillets of fish and boneless chicken breasts. The method is the same for all: one—sear; two—bake; and three—rest. It’s as easy as two-three if you skip step one, which is optional.
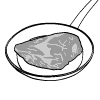
Step one. Heat some butter, oil, a combination of the two, or some other fat in a frying pan over high heat. Add the meat, previously seasoned, to the pan and quickly sear the first side. If more than one piece of meat is being seared in the same pan, leave a little space between the pieces. Never overlap them. The meat will be done on the first side when it no longer sticks to the surface of the frying pan, assuming that you are not using a nonstick pan, which is advisable. When the first side is done, turn the meat to the other side and place the frying pan in a hot, 220 °C (425 °F) or higher, oven.
Step two. Bake the meat until the internal temperature is 5 to 10 degrees Celsius (10 to 20 degrees Fahrenheit) below the serving temperature of the meat when cooked to the desired level of doneness. The difference between the temperature when the meat is removed from the oven and the serving temperature will be less for a thin cut and larger for a thick cut. It will be even larger for a roast. With a little practice it is possible to judge the degree of doneness by pressing on the meat with your finger. If the meat is still quite soft like it was when it was raw, it still is. If the meat is stiff, you’ve gone too far. Rare and medium are points in between. You want to remove the meat from the oven before it is cooked to the point where it is ready to be served. The final cooking will be done in step three.
Step three. Remove the frying pan from the oven and transfer the meat to a warm plate. Cover the plate with a bowl and throw a couple of towels over the bowl. Let the meat rest like this for 5 to 10 minutes, or even longer depending on its thickness. In a restaurant, the meat is often set to rest in a warming cabinet and then doesn’t need to be covered. The cover traps warm air around the meat to slow the cooling process. During this resting, the heat from the surface of the meat will continue to travel to the center of the meat and further cook the center. At the same time the surface temperature will slowly drop to a point where it will not be perceived as too hot to eat by the diner. During the rest period, the meat becomes firmer and easier to cut. Its water holding capacity increases which reduces the amount of juices lost during cutting.
LESS
When braising or boiling, solid items near the top of the pot will, because of their buoyancy, extend a small way out of the liquid. Japanese cooks use a wooden drop-lid to lightly press the food below the surface of the liquid.
MORE
When braising or boiling, solid items near the top of the pot will, because of their buoyancy, extend a small way out of the liquid. Japanese cooks use a wooden drop-lid to lightly press the food below the surface of the liquid. French chefs use a circle of parchment paper. The diameter of the circle is slightly smaller than the inside of the pot. Sometimes there also is a hole cut in the center of the paper to let steam escape. The paper rests on the surface and draws the liquid up the sides of the meat or vegetables floating in it.
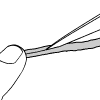
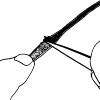
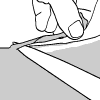
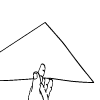
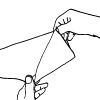
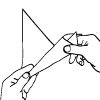
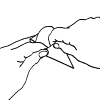
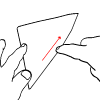
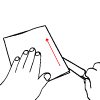
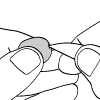
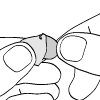
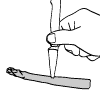
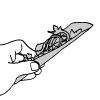
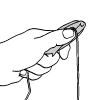
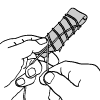
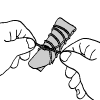
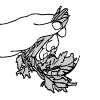
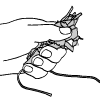
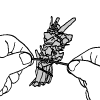
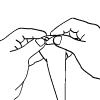
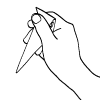
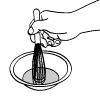
Is there anything worse than biting into a shrimp or prawn and tasting sand? It can happen if the intestine was not removed before cooking.
MORE
Is there anything worse than biting into a shrimp or prawn and tasting sand? It can happen if the intestine was not removed before cooking. The intestine, which is sometimes referred to as the sand duct, runs down the length of the abdomen—that’s the part everyone calls the tail—of a shrimp or prawn. Sometimes the intestine is empty, but then there are times when it’s full of black, gritty merde. For some unknown reason, the process of removing the intestine is called deveining.
(What’s the difference between a prawn and a shrimp? Not much. With prawns, the side plate of the second abdominal section overlaps the adjacent side plates, whereas with shrimp, the side plates overlap in succession like the tiles on a roof. Also, female shrimp brood their eggs, while female prawns cast their eggs into the water to develop separately from their mother.)
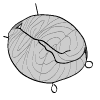
The best method to use to remove the intestine depends on how the shrimp or prawn will be used in the final dish. If it will be cooked with its shell intact, hold the tail in one hand so it is slightly curved. This will separate the side plates slightly. Slide a small metal skewer or a toothpick across and through the tail, between the second and third side plate and about 2 millimeters from the dorsal surface. Gently pull it out through the flesh towards the dorsal surface of the tail. This should expose a loop of the intestine. Gently pull the loop. The entire intestine should pull out as a single piece. This method also works well if the tail will be cooked whole but without the shell. Remove the intestine before removing the shell.
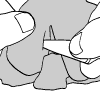
Although France is not considered a destination for pasta dishes, the French have been eating pasta for a long time.
MORE
Although France is not considered a destination for pasta dishes, the French have been eating pasta for a long time. Baked macaroni and cheese is a family-style comfort dish that goes back well over a hundred years. Fresh noodles dressed with a little butter and maybe a few fresh herbs have been sighted on the plates of more than a couple fine restaurants. When they do make an appearance, they’re usually in the form of a nid, a nest.
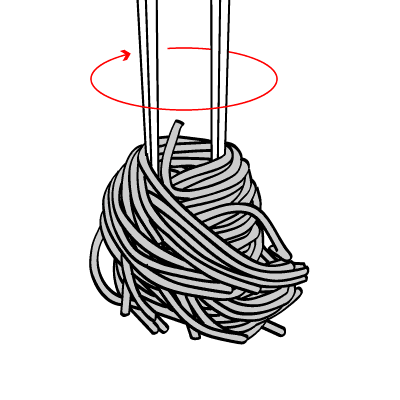
The pasta used for the nest is usually spaghetti or tagliatelli, or their fresh pasta equivalents. After the cooked pasta is dressed, a large meat fork with two straight tines is used to select a portion from the mixing bowl. The cook turns the fork in his hand while holding the tips of the tines in contact with the bottom of the bowl. The strands of pasta trapped between the tines are rolled into a cylindrical form similar to a bird’s nest. The nest is carefully transferred to the serving plate. Sometimes the portion is first put on the plate with tongs and then twisted into shape with the meat fork.
LESS
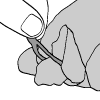
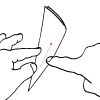
When making a
tartare, whether from beef or seafood, one trick that I’ve learned from a couple of chefs in France is that the meat must be cut by hand, not ground.
MORE
When making a tartare, whether from beef or seafood, one trick that I’ve learned from a couple of chefs in France is that the meat must be cut by hand, not ground. The meat is first cut into thin slices. The slices are then cut into a fine julienne. Lastly, the julienne strips are cut into a fine dice. Simple! The hardest cut to make is the first one, the thin slices.
I have found that the easiest and safest way to cut these slices is opposite to what most people think is safe, especially since I make the cut towards my hand. I start by laying the meat, a piece of rump for beef or a boneless fillet for fish, flat on the cutting board. For beef, I use a very sharp and very long chef’s knife. For fish, I use a long thin filleting knife. It’s sharp, too. The filleting knife is used for the fish because the oil in the fish places more drag on the knife and its smaller distance from cutting edge to spine means that it will drag less than the larger chef’s knife. In either case, the knife is held with a pinch grip and the flat of the blade is almost parallel to the board. The cut is made with a sawing motion. To support the meat being cut, the four fingers of the hand not holding the knife are placed flat on top of what will be the piece being sliced off. The fingers are held in tension so the tips curve up slightly and the plane of the fingers is offset from the plane of the blade. When the slice is completed, it is moved to a pile with the other slices awaiting to be julienned.
LESS
Parchment paper, or pan liner as it is sometimes called, comes to a commercial kitchen as large, flat sheets, not in rolls as it is sold for the home chef.
MORE
My mother used to save the paper that butter was wrapped in to use for greasing cake pans and the like. In the old days, a lot more butter must have stuck to the paper.
MORE
My mother used to save the paper that butter was wrapped in to use for greasing cake pans and the like. In the old days, a lot more butter must have stuck to the paper because when I remove the paper from my butter, there doesn’t seem to be enough butter on it to grease anything other than my fingers. Plus, how can you grease a tight corner in a pan with a piece of paper?
Of course, in a restaurant kitchen they don’t use a greasy bit of paper to grease a cake pan or a baking sheet. They use a brush. And it’s not some fancy pastry brush from the cooking store in the local mall, it’s a 5-cm wide boar-bristle paint brush available for a dollar or two from the local restaurant supply store. Using one of these brushes and some soft butter, it’s quick and easy to evenly grease just about anything. The brush also works well with oil.
LESS
Everyone knows how to break an egg, but can everyone do it without ever getting any pieces of shell mixed in or without ever breaking the yolk in the process?
MORE
Everyone knows how to break an egg, but can everyone do it without ever getting any pieces of shell mixed in or without ever breaking the yolk in the process?
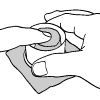
I once heard a story about a pastry chef who only baked items that included nuts because the nuts would mask any pieces of egg shell that made it into his pastries. I’ve also watched many a cook break a few dozen eggs into a bowl and then spend time fishing out pieces of shell that were contaminating the contents. And I’ve also watched cooks having a problem consistently separating eggs with the yolks intact. Their problem? They were breaking the eggs on the edge of a bowl. When you break an egg on the edge of a bowl, the edge can force some of the broken shell into the interior of the egg.
The solution is to break the egg on either a flat surface or even better, a concave one, such as the inside of a bowl. How the egg is held is also important. It should be held with three fingers so only the smallest amount of shell extends past the fingers.
To learn how to hold the egg for breaking, lay an egg on the work surface so the long axis of the egg coincides with the axis of your arm. Without picking the egg up, place your hand over the egg so your thumb is on one side and your forefinger and middle finger are on the other. Your fingers should be bent so the egg is cradled in your hand. Now pick the egg up. If you look at it sideways you’ll see that your fingers prevent the egg from extending much past them. Now when you tap the egg on the work surface, your fingers will limit how much of the egg can be broken. You don’t need to tap too lightly—you want to break the egg convincingly, not tentatively. Once you break the egg shell, the egg can be opened with two hands or with just the one holding it, like the professionals do. The way they open the shell with one hand is to move their forefinger and middle finger in opposite directions while the back of the egg is still cradled in their hand. The egg will open up as if there were a hinge on the back side.
LESS
Whisks are available in a variety of shapes and styles, but the whisks I’ve seen and used in French kitchens have been the standard, straight 10-wire whisk.
MORE
Whisks are available in a variety of shapes and styles, but the whisks I’ve seen and used in French kitchens have been the standard, straight 10-wire whisk. I own a 10-wire balloon whisk that I use for whisking egg whites and cream, but it’s the straight whisks that I turn to most often. I own a couple of different lengths, but I probably use the shortest one with 10-cm long wires most frequently. I don’t own a flat whisk and can’t say I’ve ever seen one in use. It is supposed to be used for making sauces. It’s design seems to dictate using it in a frying pan, but a flat wooden spatula seems to work fine when I make pan sauces. When I make a separate sauce, I use a saucepan. A saucepan is deeper than a frying pan and a flat whisk isn’t angled enough for a deep pan. A regular whisk seems to work just fine.
The mistake that most people make with whisks is that they hold them incorrectly. They grip the whisk like a club, but a whisk is best held, unless it’s too large, like a pencil. Holding it in this manner allows you to use the whisk principally by rotating your wrist. This takes less effort and is less fatiguing than moving your whole arm and part of your upper body, as you would when you hold the whisk like a club. If one hand gets tired, use the other for a while.
LESS
It’s not uncommon for the recipes that professional chefs use in France to never call specifically for salt in the instructions.
MORE
It’s not uncommon for the recipes that professional chefs use in France to never call specifically for salt in the instructions. I once asked a chef why this was so and he replied that a chef would know when to salt and when not to salt. Even if a recipe does call for salt, there’s one application of salt that is always understood and never, in my experience, written in the instructions—sweating.
It is common to briefly cook vegetables, especially aromatics such as onions and shallots, before adding the other ingredients to a recipe. This cooking is referred to as “sweating” because some of the water in the vegetable is driven out and evaporated. To facilitate the sweating, a small amount of fine salt is sprinkled over the vegetable. The amount is not enough to really season the vegetable, but it does cause the vegetable to give up a bit of the water in its cells. The water causes the vegetables to steam, which cooks them faster without browning.
LESS
©2005, 2014 Peter Hertzmann. All rights reserved.