 Preheat oven to 160 °C (320 °F). Butter two 7-cm (23/4-in) wide by 14-cm (51/2-in) long by 51/2-cm (21/4-in) deep loaf pans, and set aside.
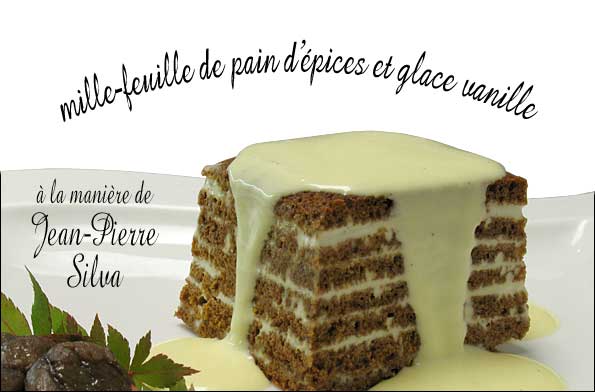
Jean-Pierre Silva was the first Michelin-starred chef with whom I had an opportunity to work beside. I wrote briefly about my experience in 1998 in one of the first articles to appear on this web site. One of the deserts that I watched Chef Silva prepare was mille-feuille de pain d’épices et glace vanille, a “cake” made of many very thin layers of spice bread with each layer separated by an equally thin layer of vanilla ice cream. The cake was served with a sauce of crème anglaise. I’m sure the plate was decorated in some manner, but I no longer remember what the decoration was.
This was one the dishes that Chef Silva considered his signature dishes. As he was preparing it one evening, he confided that the secret to the dessert lay with the spice bread recipe, and that the recipe would remain a secret. He did whisper that the bread had to be a bit dry with a very fine crumb and have no large air holes. Of course, Chef Silva made his own spice bread as well as the vanilla ice cream to fill the space between the slices.
Shortly after my time with Chef Silva was finished and I was passing through the railway station in Dijon, I noticed a book of Burgundian cooking in the window of the station bookstore. Out of curiosity I opened the book and, lo and behold, there was the chef and six of his recipes in living color. Of course one of the recipes was the one for the mille-feuille. (Philippe Lamboley, Saveurs & terroirs de Bourgogone: 100 recettes de terroir par les chefs, Paris: Hachette Livre, 1997, p. 108.) But the chef had kept his word. The recipe for the dessert was in the book, but in the ingredients list it just said pain d’épices. The recipe didn’t say how to make the bread or what its attributes should be except that it should be 20 cm (about 8 in) in diameter and weigh 300 to 400 grams (about 11 to 14 ounces). (The recipe was also served with a coffee-flavored crème anglaise instead of a plain one, but more about that later.)
On and off during the eight years since that visit with Chef Silva I’ve tried to make the dessert with varying degrees of success. I first tried it with an off-the-shelf spice bread imported from France. As soon as I unwrapped the package, I knew that this attempt was doomed. The bread was pre-sliced into thick slices and was dripping with honey. So I started trying spice bread recipes. Some were too crumbly. Most were too moist and had an uneven crumb with too many large holes. I tried modern recipes and some from a century ago. The problem was that these recipes produced breads that were very tasty to eat but not well suited to be sliced thin and layered with ice cream. I finally decided to take one of the better recipes and modify it to suit the mille-feuille recipe.
After a few tries baking the bread in a round pan, I decided that a rectangular pan would be easier to work with. The round cake was too difficult to cut into thin layers, and my layers, even today, are not as thin as the 1-millimeter (0.04 inches) thick layers that the Chef specifies in the recipe. I tried a long rectangular cake pan a couple of times, but eventually settled on multiple short, rectangular cake pans—sometimes referred to as mini-loaf pans—because they were easier to slice and assemble.
Chef Silva, like most chefs in France, had a special freezer for holding ice cream for service. The freezer keeps the ice cream frozen but not hard, so it can be easily spooned out. I do remember that even with this ideally stored ice cream, the chef had problems spreading the layers to an even thinness. Right out of the freezer the ice cream was too hard and after a little working, the ice cream was too soft. I had a similar problem the first few times I tried to recreate the recipe. But I’ve found a way to make the process very simple—don’t freeze the ice cream solid before assembly.
What is ice cream? How is it made? First you make a flavored, unbaked custard, essentially a crème anglaise. Then you slowly chill it to freezing while stirring the mixture so that ice crystals don’t form in it. Finally, the mixture is placed in the freezer to harden fully. I decided to try making the ice cream for this dessert only part way. I first cook the custard on top of the stove in the normal manner. Then I place the saucepan with the hot liquid in an ice bath and cool the mixture down to its freezing point. At this point it is cold and very thick but still pourable. Then, rather than spreading the ice cream with a spatula, I ladle a small amount of the viscous liquid into the mold and tilt the mold until the layer is evenly distributed over the spice bread. Before adding the next layer of bread and ice cream, I place the mold in the freezer for five minutes. Amazingly, the mixture is chilled enough so that ice crystals do not form when the cake is frozen solid, and the layers are more uniform than can be obtained with a spatula.
Once the mold is full with the ice cream and spice bread, I place it in the freezer for a couple of hours to harden a bit more, but not too much. Before it gets too hard to cut, I unmold the cakes and cut each crosswise in half. Because the mini-loaf pans are twice as long as they are wide, the cut mille-feuilles form two squares with slightly tilted sides. I trim the sides to remove excess ice cream and to evenly shape the cakes into individual square pyramids. The mille-feuilles are then wrapped in plastic wrap and frozen hard.
The recipe I use for the crème anglaise is almost exactly the same as the recipe for the ice cream. The only difference is that the ice cream is made from a combination of milk, cream, and whole eggs, whereas the sauce is made totally from cream and egg yolks. After making the sauce, I chill it in a very cold refrigerator. To serve, I place the sauce in a gravy-boat and pour it over the cake. The sauce is very thick but still pourable. And I never flavor it with coffee. There are so many different flavor elements from the spices in the pain d’épices and ice cream that I don’t think the coffee flavor would add anything but confusion.
All the components of the final concoction are prepared ahead of time so this is a good dessert to serve guests. The only difficult part is to remember to transfer the mille-feuilles to your refrigerator an hour or so before serving so they are not too hard. The timing is a function of how cold your freezer and refrigerator are. It can only be determined through trial and error. It may take you a few tries to get the timing just right, but the errors taste great, too.
Although it is possible to prepare the mille-feuille from start to finish in a single day, it is best to prepare the pain d’épices at least a day in advance so it has a chance to cool. The recipe I use is adapted from one I found in a book titled Paris Boulangerie-Pâtisserie. (Linda Dannenberg, Paris Boulangerie-Pâtisserie, New York: Clarkson Potter, Publishers, 1994, p. 70.) The original recipe in the book is from André Lerch, a longtime Parisian pâtissier with Alsatian roots. Supposedly, “crowds line up outside his door for his famous pain d’épices, traditional Alsatian spice bread.”
RECIPE To prepare the spice bread according to my rendition, I butter two mini-loaf pans, each 7 cm (2-3/4 in) wide by 14 cm (5-1/2 in) long by 5.5 cm (2-1/4 in) deep. I also preheat the oven to 160 °C (320 °F). In a medium saucepan, I place 200 grams (7 oz) of honey, 75 grams (6 tablespoons) of light brown sugar, and 175 ml (3/4 c) of water. I bring this mixture to a boil and then carefully add 1/2 tablespoon baking powder and 1 teaspoon baking soda. I say carefully because when these two leavening agents are added to the boiling liquid, the liquid bubbles up rapidly and temporarily doubles in volume, which is why a larger than normal saucepan is used. While the mixture is still boiling, I add the spices. These consist of 1/2 tablespoon each of ground anise seeds, ground allspice, ground cinnamon, ground nutmeg, and ground ginger. The recipe also calls for 1/2 teaspoon of ground cloves, but I find this makes the final mille-feuille taste too spicy so I usually leave it out. When the spices are evenly distributed throughout the boiling liquid, I take the saucepan off the heat and transfer the contents to the bowl of an electric mixer fitted with a paddle.
Next I divide the all-purpose flour for the bread into two portions of 125 grams (4-3/8 oz) each. The first portion is slowly added to the liquid in the mixer with the paddle moving at a medium speed. After the first portion of flour is incorporated, I add 1 whole egg and 1 egg yolk to the bowl and continue mixing. When the eggs are fully integrated, I add the second portion of flour.
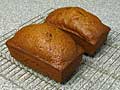
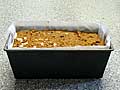
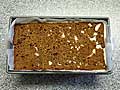
After all the ingredients come together into a very thick batter, I divide it between the two loaf pans. I bang the pans sharply on the counter to get the batter to move into the corners of the pans. Lastly, I place the loaf pans in the center of the oven and bake them until the bread is done, about 55 minutes or so.
I remove the finished loaves from the pans immediately upon removing them from the oven and set them to cool on a rack. They must be thoroughly cooled before cutting.
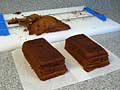
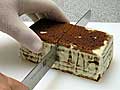
RECIPE I’ve tried a number of methods to cut the bread into thin, even slices. What seems to work the best for me is to cut against a set of guides. I have a pair of 3-mm (1/8-in) thick copper bars that I tape onto a flat cutting board with one on each side of a loaf to guide the knife. The original recipe calls for slices that are 1-mm (0.04-in) thick. Besides being extremely difficult to cut, the bread tends to get lost in the ice cream when sliced this thin.
I would prefer to use a knife with a serrated edge, but the one I have is serrated only on one side and it wants to pull to that side when I cut with it. As an alternative, I use a long, straight, thin carving knife. With each loaf held in an upright position, I cut it horizontally from the bottom up. The part of the loaf that rose away from the edges of the loaf pan to give the loaf a domed top will be discarded. I typically will get about seven or eight slices from each loaf. Along with the ice cream filler to be added later, this will be sufficient bread to fill the same loaf pan when the final mille-feuille is assembled. The first few slices are fairly easy, but as there is less bread to hold, it becomes harder to remove each slice in one piece. As each slice is removed from the loaf, I stack them up so I retain the order they were cut in. Also, any slice that breaks is reassembled in the stack. It is important to maintain the order because the sloping sides of the loaf pan make the bottom slices slightly smaller than later slices. The change in size will produce the slightly pyramidal shape of the final mille-feuille.
When I tape two guides to the cutting board, I place them slightly farther apart than the width of a loaf. Also, the guides are placed close to the front edge of the board to accommodate the length of the knife blade and to prevent the edge of the board from interfering with the handle of the knife. I am fortunate to have my pair of copper bars, but guides could easily be fashioned from one or more layers of stiff cardboard.
For each cut, I hold the loaf firmly in my left hand and saw back and forth with the knife held in my right. The loaf has to be pressed with even force into the cutting board and the sawing motion needs to be as long as the blade will allow. As each slice is cut from the loaf, it is stacked on top of the slice previously cut.
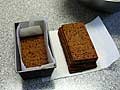
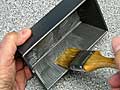
Before I can use the slices to build the mille-feuilles, I need to prepare the molds and the ice cream. The molds are the exact same loaf pans that were used for baking the pains d’épices. I wash and dry the molds and line them with parchment paper. The parchment paper makes removal of the finished mille-feuilles very easy. After I place the paper into the mold, I insert the first slice of bread, crust side down, into the mold to keep the paper from moving. The quality of this first slice is the most important because it becomes the top of the finished mille-feuille.
It’s now time to make the ice cream. I place a small saucepan over medium heat and add 175 ml (3/4 c) of whole milk, 200 ml (7/8 c) of heavy cream, and a whole vanilla bean that has been split in half. Then I raise the heat to high and bring the mixture to a boil. I stir it occasionally and as soon as it boils I remove the saucepan from the heat. It takes about 5 minutes for the vanilla to infuse into the milk and cream. While this is taking place, I break 2 eggs into a bowl and whisk in 100 grams (1/2 c) of granulated sugar. I also set up an ice-water bath in a large bowl that can easily hold the saucepan.
When the vanilla is infused, I discard the bean. The hot liquid is slowly whisked into the egg-sugar mixture. When everything is throughly combined, I return it to the saucepan, which is placed back on the stove and the heat turned to high. From now until when the custard is thick, I continuously whisk the mixture. It is important to keep the mixture agitated so the eggs don’t curdle. When the mixture thickens, which is when it just about comes to a boil, I quickly move the saucepan to the ice-water bath and continue whisking until the mixture is quite cold and thick. The ice cream mixture will stay in the saucepan in the ice-water bath until it is all used up.
At this point I set up a work area on my counter that has the two molds lined with parchment paper that already contain the first slice of each spice bread. There is also space on the counter for the ice cream in its ice bath and the two stacks of spice bread slices. There’s also a 30-ml (2 tablespoons) ladle that I will use for adding the ice cream. In my freezer, I’ve cleared a space where the molds can sit level. The filling process now commences.
I add one ladleful of ice cream to each mold and then turn the molds about to evenly distribute the ice cream entirely over the slice of bread. After each ladleful of ice cream is added and evened out, I place the molds in the freezer for 5 minutes to partially harden the ice cream. When the 5 minutes have past, I remove the molds from the freezer and carefully place the next slice of spice bread on the partially hardened ice cream. I carefully press the bread slices onto the ice cream so the ice cream begins to flow into the holes in the bread. Then I ladle another layer of ice cream over the new slices of bread and tip the molds to spread it. Next, I return the molds to the freezer. The process is repeated until all the bread slices are used up. The last layer consists of bread without ice cream on top. If a piece of bread is broken, I reassemble it and use it for a single layer just as I do with unbroken slices. Once all the bread slices are in place, I place the molds in the freezer for a few hours to solidify the future mille-feuilles.
Once the mille-feuilles are solid, I remove them from the freezer. Some of the ice cream will have oozed between the parchment paper and the mold. I use a thin, plastic spatula to separate the paper from the mold on all the sides. Then, I lift the mille-feuille from each mold by its paper wrapper. Once removed from the molds, I peel the paper from the mille-feuilles and discard it. I carefully cut each mille-feuille into two smaller mille-feuilles of equal size. I use the same long thin knife that I used for slicing the bread for this cut. I further trim the cut edge of each mille-feuille so its angle matches that of the other three sides.
There will be excess ice cream on the edges of each cake. I can easily scrape this away with a thin spatula or cut it off with the knife. After each mille-feuille is trimmed, I wrap it in plastic wrap and return it to the freezer.
RECIPE I prepare the crème anglaise almost the same way as I prepare the ice cream but with slightly different ingredients. I bring 120 ml (1/2 c) of heavy cream and a split vanilla bean to a boil in a small saucepan. Once again, I set it aside for 5 minutes to infuse. While this is happening, I whisk 2 egg yolks with 40 grams (3+ tablespoons) of granulated sugar and prepare an ice-water bath to hold the saucepan. When the infusion is complete, I again discard the vanilla bean. Then I slowly and carefully whisk the hot cream into the egg-sugar mixture. When throughly combined, I transfer the mixture back to the saucepan. I place the saucepan over high heat and whisk vigorously until the sauce is thickened. Immediately when the sauce thickens, I transfer the saucepan to the ice-water bath and continue whisking until the sauce feels cool to the touch. I pour the sauce into a gravy-boat that I will use for serving and chill it thoroughly in the refrigerator. The sauce will thicken further as it cools.
Right out of the freezer, the mille-feuilles are too hard to eat. I have found that transferring them to the refrigerator about an hour before I plan to serve them softens them sufficiently without the ice cream melting. I’ve figured this out from trial and error, and the timing will be different in another kitchen.
To serve the mille-feuilles, I place each one on a separate chilled serving plate and serve the chilled sauce in its gravy-boat so each guest can pour some over the top of their mille-feuille. If you wish, the plates can be decorated with a sprinkling of ground cinnamon.
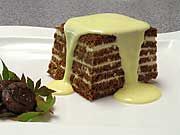
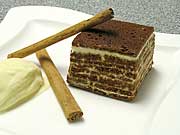
As an alternative to serving the mille-feuilles with the sauce, additional vanilla ice cream can be prepared and a scoop served alongside the cake. Or the cakes can be frosted with sweetened, whipped cream. The frosted ensemble should be placed in the freezer to harden the whipped cream and then tempered in the refrigerator as before.
No matter how you choose to serve these mille-feuilles, you’ll find this dessert tasty. The combination of the cool ice cream and the intensity of the spices on the tongue is quite enjoyable.