fromage de tête
I cannot remember when I first became aware of fromage de tête. It wasn’t that long ago, but it wasn’t recent either. It somehow entered my consciousness and just bounced around for a while. In the meantime, I cooked other dishes where I learned the techniques I would eventually need to prepare this one. Although it wasn’t as bad as having a melody that I couldn’t get out of my head, fromage de tête always seemed to be there.
I do know that about half a year ago, I was talking with my butcher about obtaining some fatback for sausage making and somehow the conversation drifted to where he was listing all the other marvelous parts of the pig that he stocked. When he mentioned that he always had pigs’ heads in the freezer, both whole and halves, I made the commitment that I would be back shortly to buy one.
Every now and then I’d pull a few books off the shelf and look for fromage de tête recipes. They proved to be more plentiful than I had expected, but mainly if I looked in older books. One of the first was a charcuterie book published in the 1930s. I only found a couple of modern recipes, one in a charcuterie book written for professionals and one in a celebrity cookbook from a Michelin three-star chef in the Alsace.
As I searched, I found that the dish goes under a number of names. Fromage de tête is literally “cheese of the head,” in English, or what Americans call “headcheese” and the British call “brawn.” French-language variations of fromage de tête include tête fromagée (cheesy head), fromage de cochon (pig cheese), and pâté de tête (head paste). As I moved to older and older recipes, the dish was more likely to be called hure de porc or hure de sanglier (wild pig) than fromage de tête. (I know of no English translation for hure.) The earliest recipe I found was from 1656, and there were others from 1674 and 1691. I found only one from the 18th century, but my resources are a bit skimpy for this century. I found a very nice recipe published in 1852 in a book of traditional country cooking. The one I found in the original Larousse Gastronomique published in 1938, was simply described as ancienne, or very old. One food reference traces this dish in England back to the Middle Ages, although the original form described is a bit different. I suspect it goes back to much earlier times because it is a simple way to transform a pig’s head into easy eating.
What is fromage de tête? Quite simply: lunch meat. But maybe that’s too simple. Fromage de tête consists of chunks of meat, fat, and skin taken from the head, and sometimes feet, of the pig, and occasionally of veal or sheep, that are “glued” together with gelatin. Fromage de tête can be wrapped in pig skin and shaped like a fat sausage or it can be simply formed in a mold. It is eaten cold, often with some mustard and maybe a few cornichons.
The preparation process takes a number of days from start to finish, but very little actual time at the stove. The pig’s head, along with a couple of extra tongues and a few feet, are soaked for about three days in a simple brine. Then the pieces are rinsed, drained, and placed in a stock pot with aromatics, wine, and water. The contents are cooked at a simmer until the meat is tender, the fat is gelatinous, and the skin is soft. Then, while still warm, the bones are removed from the head and feet and the tongues are skinned. All the soft remains are cut into strips or small chunks. These are mixed with a little of the cooking liquid, that now contains plenty of gelatin, and packed into molds or wrapped with the skin. These are cooled until firm and then sliced for serving.
All the recipes I found were similar. The process was always as previously described, but some recipes loaded the brine with lots of aromatics or some loaded the cooking liquid with many extra ingredients. Based on my experience in brining and cooking meats where I have found that simple ingredients often produce more subtile flavors, I decided to prepare an amalgamation of many of the recipes, rather than one or two in particular.
Day 1
To make fromage de tête you’ll first need to obtain the raw ingredients. Because I am limited by the size of my equipment and appetite, I started with half a pig’s head. It weighed about 3 kilograms. My butcher sawed it into three pieces so it would better fit in my brining tubs and stock pot. To this I added two additional pigs’ tongues, which together weighed about half a kilogram, and two pigs’ feet, which together weighed about a kilogram. The head should be clean when you get it from your butcher. (In the old days, the head would require scraping before it could be cooked.) I removed and discarded the brain and the eye. The brain I removed because many of the recipes said to do so. It is so fragile that I doubt it would last through the hours of cooking that the head requires. I just used my fingers to peel the brain from the boney cavity it was sitting in. It came out very easily. None of the recipes mentioned removing the eye, but I was curious as to how it was attached. I used a small pointed knife to cut around the eye where it is attached to the socket. This turned out to be tedious as the attachment is quite tough and difficult to cut.
I first placed all the pieces to be brined in the brining vessels. I use large, plastic storage containers, but any non-reactive container with a lid that will fit in your refrigerator will do. The meat is covered with cold water and then removed. By measuring the water left behind, I know how much brine to make. Once I have the quantity determined, the first batch of water is discarded. In my case, I needed to prepare 5 liters of brine. I use these proportions: for each liter of cold water I add 100 grams of coarse sea salt, 2 grams of fine salt containing 6% sodium nitrite, and 25 grams of brown sugar. The nitrite fixes the red pigment in the myosin when the meat is cooked so the color remains pink. It can be quite toxic in sufficient quantities so measure this ingredient very carefully.
Most charcuterie recipes instruct one to bring the brine to a boil and then cool it to less than 4 °C. I think this takes too long so I just add the salts and sugar to cold, filtered water and stir with a high-speed immersion blender. In a couple of minutes, everything is dissolved and I’m ready to move to the next step. I inject all the soft parts of the head plus the tongues with some of the brine. (The feet don’t require injection of brine because there are no thick areas of meat that need a head start.) All the meat is then submerged in the brine in the brining tubs and weighted with a plate to stay below the surface. The tubs are covered and placed in the refrigerator. The pork is brined for three full days.
Day 2 & 3
Each of the following days, I refresh the brine. To do so, I remove all the meat from the tubs and then place it back in but in a different position. The goal of this process is to ensure that there are no areas of meat not exposed to the brine. After the brine is refreshed, the meat is weighted down with the plate again, and the tubs are covered and returned to the refrigerator.
Day 4
After three days of brining, the meat needs to be cooked. The whole process will take four or five hours, so don’t start too late in the day. I first remove the meat from the brine and rinse it well with cold, running water. It is then placed on a rack to drain. The brine is discarded. I assemble the aromatics on a separate plate: 150 grams celery stalks, cut in half; 300 grams carrots, peeled and trimmed but left whole; 1 large onion, about 200 grams, peeled but left whole; 1 bouquet garni (I used flat-leaf parsley, bay, and thyme); 20 black peppercorns; 40 whole coriander seeds; and a 750-milliliter bottle of white wine. All the ingredients are placed in a large stock pot over high heat. I had to do some creative arranging to fit everything in a 10-liter pot. Finally, I filled the pot with cold water to cover the contents.
As the water begins to boil, I skim any scum that rises to the surface. There isn’t much. I plan on the meat taking about 3 hours to cook. The tongues maybe a bit less, the feet a bit more. The liquid is kept at a simmer, and I stir the contents every half hour or so. The head is cooked when the skin becomes quite soft and begins to easily fall off the bones. The tongues are done when the tip of a sharp knife can be easily inserted into them. The feet are done when the skin is soft and the feet are falling apart. The ear has a cartilage that runs through its center that never becomes totally soft, but it is cooked when the skin is soft.
When the meat is done, I place it in a large strainer set over a bowl to catch the dripping fat and stock. The large pieces of vegetable are discarded. I strain the cooking liquids through a chinois lined with a couple of layers of butter muslin (fine cheesecloth). The stock is returned to a clean saucepan or stock pot and boiled to reduce it by about half. I take a couple tablespoons of the stock and place it in a small glass bowl. This is refrigerated to see how hard the gelatin becomes. This gives me an indication of how much I have to reduce the cooking liquid in order to produce a gelatin that is hard and strong. Usually the unreduced gelatin will gel just fine but not be as strong as I would like.
While the stock is reducing, I use a small knife to peel the tongues. A long meat fork is inserted through the center of each hot tongue to make it easier to hold. For the style of fromage de tête being assembled, the tongues are left whole. I use my hands to remove all of the meat, skin, and fat from the head and feet. Everything is removed, even the really small pieces. As I separate the meat, it is set aside on a clean baking sheet. I remove and discard any small pieces of vegetable that are stuck to the meat. In the end, I have a bowl of discards of about the same quantity as the edible portion.
Here I have a decision to make. Some recipes call for cutting the meat into long strips. Others say to cut the meat into small cubes. The strips will be necessary if I want to produce a neater, more organized, slice in the finished fromage. The cubes produce a more rustic appearance in the final dish. I chose to cut the meat into small chunks.
At this point, the meat is still slightly warm and quite moist. The stock is reduced by half. The meat seems a little dry, so I add a little of the reduced stock and mix it in. I choose two metal bread pans to use as molds for the fromages, and place a 2-centimeter layer of meat in the bottom of each pan. One of the tongues is placed on the center of the meat layer, and the remaining space in the pan is filled with meat. I level the tops and press the meat down a bit. At this point, the meat is about a centimeter below the lip of the mold. I finish filling the molds by ladling some of the reduced stock over the tops until it no longer sinks into the meat.
Before proceeding, I cut a double thickness of corrugated cardboard so that it is barely smaller than the top surface of the meat in each of the molds, and cover each of the cardboard pieces with a double thickness of plastic film. The molds are placed on a baking sheet with sides, and the cardboard pieces set on top of the meat. The cardboard is pressed down with about 2 kilograms of weight. I use glass bread pans filled with enough water to bring them to the proper weight. Some people use a brick covered with aluminum foil. You can use whatever you find convenient. When I add the weight to the molds, the liquid overflows. (That’s why a baking sheet with sides was used.) I don’t worry about cleaning the overflow from the baking sheet; it will peel off easily when it has gelled. Finally, the whole assemblage is carefully placed in the refrigerator to harden overnight.
While the fromages are hardening, I clarify the leftover stock. This is really not necessary if you are only using the stock for a thin coating over the molded fromages. I clarify the stock with two beaten egg whites and a good amount of shredded cabbage—I combine the egg whites with the cabbage first and then add to the stock. The combination is brought to a low boil. When the stock is clear, I carefully strain the stock through a fine strainer and then through a chinois. If I need the clarified stock right away, I cool it in an ice-water bath. Otherwise, I set the clarified stock in the refrigerator overnight. It will harden, but it can easily be liquified over low heat the next day.
Day 5
The baking sheet and its contents are removed from the refrigerator. I carefully remove the weights from the molds and the molds from the baking sheet. Gelatin stuck to the outsides of the molds is peeled off. I place one mold in a roasting pan, and fill the roasting pan with hot tap water two-thirds the way up the sides of the mold. My hot water isn’t super hot so I place the roasting pan, without the mold in it, over a burner to make it hotter. My goal is to just melt the gelatin in the fromage de tête where it contacts the surface of the mold, so the fromage will release. I dip the mold in the water for a few seconds and then remove it. The bottom of the mold is dried with a towel and I attempt to turn out the fromage. It doesn’t release the first time, so it’s returned to the water for a few seconds more. A metal mold takes very little time to release. At this point the plastic-covered cardboard is still attached to the fromage, and there is a ridge of gelatin attached to cardboard. This is peeled off. I return the unmolded fromages to the refrigerator for a few minutes to chill the outer surface.
While the fromage is chilling, I peel the reserved gelatin (clarified stock) from its container and place it in a small saucepan. The saucepan is placed over low heat and the gelatin is gently melted. To use the gelatin, it should be just above the temperature where it solidifies, which is close to room temperature.
I remove the chilled fromages from the refrigerator and carefully peel off the plastic-covered cardboard. The plastic is discarded, but the cardboard is saved to use again. I trim the loose edge of gelatin remaining after the cardboard is removed with a pair of sharp scissors.
The fromages are placed on a rack placed over a baking sheet. I brush the exposed surfaces with gelatin and return the fromages to the refrigerator to set the new gelatin coating. I do this a couple more times to build up the thickness of the coating and to fill any dips or divots in the surface. Once the thickness is sufficient, the fromages are turned over and the same coating process is applied to the last surface.
When the gelatin coating is hard, I wrap each fromage with a double layer of plastic film. It is important that the top, bottom and sides are wrapped. The ends are unimportant because these will be trimmed off before serving. This film is left in place for handling the fromage and not removed before cutting. Only after a slice is cut, do I remove the plastic from the slice.
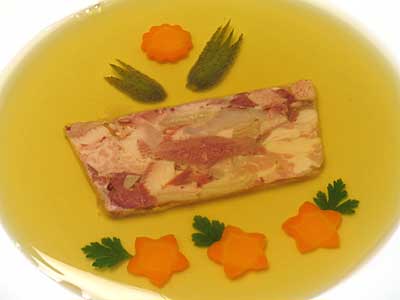
I can now slice and serve the fromage de tête. It is served with a couple of cornichons and a dollop of coarse mustard. Leftovers will last for at least a week in the refrigerator. I have not tried to freeze a fromage de tête.
Because I have lots of gelatin left over, I will prepare a fancier presentation. I use one deep, chilled plate for each serving. In order to not carry the plates back and forth to the refrigerator to set the gelatin, I place them on baking sheets with sides and add enough water and ice to almost come to the edges of the plates without allowing them to float. It is also necessary to shim one edge of the baking sheets so the bottom of the plates are absolutely level. If a plate isn’t level, the gelatin coating will be thicker on one side than the other.
A slice of the fromage de tête is placed in the center of each plate. The slices are 7 to 8 millimeters thick. I arrange some garnishes around the meat. I use slices of cooked carrot, washed and dried flat-leaf parsley, and cornichon halves with their ends trimmed. A thin layer of gelatin is carefully ladled over the empty spaces on the plates, just enough to cover the bottom. This first layer has to be thin enough so everything on the plate doesn’t float or move. If the plates are sufficiently cold, this layer gels almost immediately. Once it is hard, I add a second layer of gelatin that comes up to the top of the meat, or maybe even covers it a little.
Once the gelatin is hard, it is quite sturdy. I remove the plates from the ice-water bath and dry their bottoms. The plates are refrigerated until it’s time to serve them.
Day 4, bis
Another way to mold the fromage de tête is to form it in a piece of pork skin. Some of the recipes called for using some of the skin from the pig’s head, but I don’t like this because the skin thickness seemed to vary. I use a couple squares of skin from the back of the pig. Your butcher should be able to provide these. I simmer these separately in a large saucepan of lightly salted water until they were soft, about two hours. The skin shrinks and thickens substantially when cooked. Once cooked, I remove the saucepan from the heat, but leave the skin in it until needed. If it cools too much, it will harden.
When the meat is at the stage where it is ready for molding, I remove the skin from the saucepan and dry it well. (For this version of fromage de tête I cut the tongues into cubes to match the rest of the meat.) I place a large piece of plastic film on a work surface and place the skin pieces side by side on the plastic. The skin is trimmed so it produces an even rectangle. I then place a substantial amount of the meat along one long edge of the skin. The loose edge of the skin is folded over the meat, and the plastic film is gathered around it to form the combination into a cylinder. (In the old days, a towel or a piece of linen was used instead of plastic.) My plastic is a bit narrow, so I carefully and tightly wrap another piece around the first. Once the skin is rolled around the meat into a cylindrical shape, the ends of the plastic are twisted tightly to force the filling in the center to be compact. I tie the ends with string so they don’t untwist. The fromage de tête are placed in the refrigerator to set the gelatin.
Day 5, bis
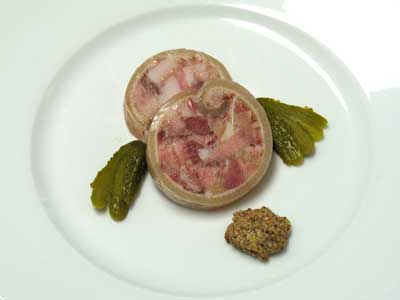
The fromage de tête is removed from the refrigerator. I unwrap it and rewrap it with a double layer of plastic film. This film is left in place for handling the fromage and not removed before cutting. Only after a slice is cut, do I remove the plastic from the slice.
The fromage de tête is now ready for slicing and serving. I serve it with a couple of cornichons and some coarse mustard. It will last for at least a week in the refrigerator.
If you’ve made it this far in this article, the concept of fromage de tête must not seem too foreign to you. Although it can take almost a week to complete, I think it is well worth the effort.
©2007, 2014 Peter Hertzmann. All rights reserved.