March 24, 2014
Amuse-Bouche

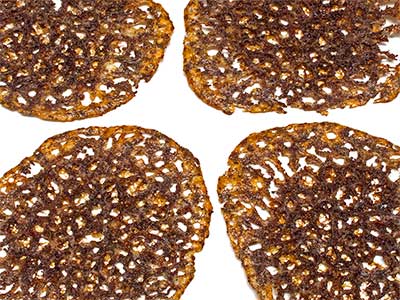
tuile de fromage et de cacao
(cocoa-cheese wafer)
When we last left the subject of roasted, peeled, and ground cocoa beans the thought was: “This preparation will require more work”. The cocoa-cheese wafers were not ready for prime time. With a little rehearsal and a touch of rewrite, the show is ready to premier.
The cocoa beans I used were produced by Claudio Corallo the islands of São Tomé and Príncipe off the coast of Africa. The product was labeled as favas de cacao torrado in Galician, or roasted cocoa beans. I peeled them and removed the germ before using. For this preparation, I simply ground the beans in a cheap spice grinder they started to heat up and clump a bit.
I knew from experience that a lot of different cheeses would work. Italians use hard, dry cheeses for frico. In France, chips de fromage are made from moister cheeses. I decided to try a cheap soft cheese, Trader Joe’s pepper jack. I used a cheap, old box grater to grate it.
I solved my earlier problem of uneven cocoa distribution in the cheese by processing 13 g of the ground cocoa beans with 55 g of grated cheese in a mini-food processor until well blended. The grated cheese went from long strands to very short ones, but that didn’t seem to be a problem. Over processing would have melted the cheese, and that would have been a problem.
In preparation for cooking the wafers, I preheated my oven to 210 °C (410 °F). I also placed a silicone-rubber mat on a half-size, rimmed baking sheet. Then using a 7-cm (2-3⁄4-in) diameter flan ring, I arranged six circles of the cocoa-cheese mixture in a two-by-three pattern on the baking sheet. It was important to evenly space the wafers because as they melted, there was some spreading. About a tablespoon and a half of the mixture was used for each circle. Before moving the flan ring each time, I used my fingers to gently level and tamp down the mixture.
The wafers were “baked” for about 9 minutes. The time may be different in your oven. As the wafers cooked and the cheese melted, there was lots of bubbling. The wafers were declared done when the bubbling began to subside, but before it stopped altogether.
Once cooked, the wafers were removed from the hot baking sheet immediately. I just pulled the silicone-rubber mat off the baking sheet onto a cool, heat-proof surface. Alternatively, the wafers could be quickly removed from the pan with a spatula and formed into tuile-shapes over a wooden rolling pin.
Once cool, the wafers were ready to eat. In an air-tight container they’d last quite a few days at room temperature, but they never got the chance.
© 2014 Peter Hertzmann. All rights reserved.
